🛠 Creating a Custom Bot
Prime Automation gives you full flexibility to build your own custom trading bot using TradingView alerts. Whether you're using ChartPrime indicators or your own Pine Script strategy, this feature enables real-time, webhook-triggered trading — directly from your TradingView charts.
With full support for Bitget, BloFin, and TradeStation, your custom bot can operate on spot or futures markets using structured alerts.
📍 Step 1: Navigate to the Custom Bot Setup
From the top navigation bar:
🖱️ Click
Custom Bot
This opens the 3-step bot creation wizard.
⚙️ Step 2: Fill Out General Settings
On the first screen, you'll define how your custom bot behaves.
 |
|---|
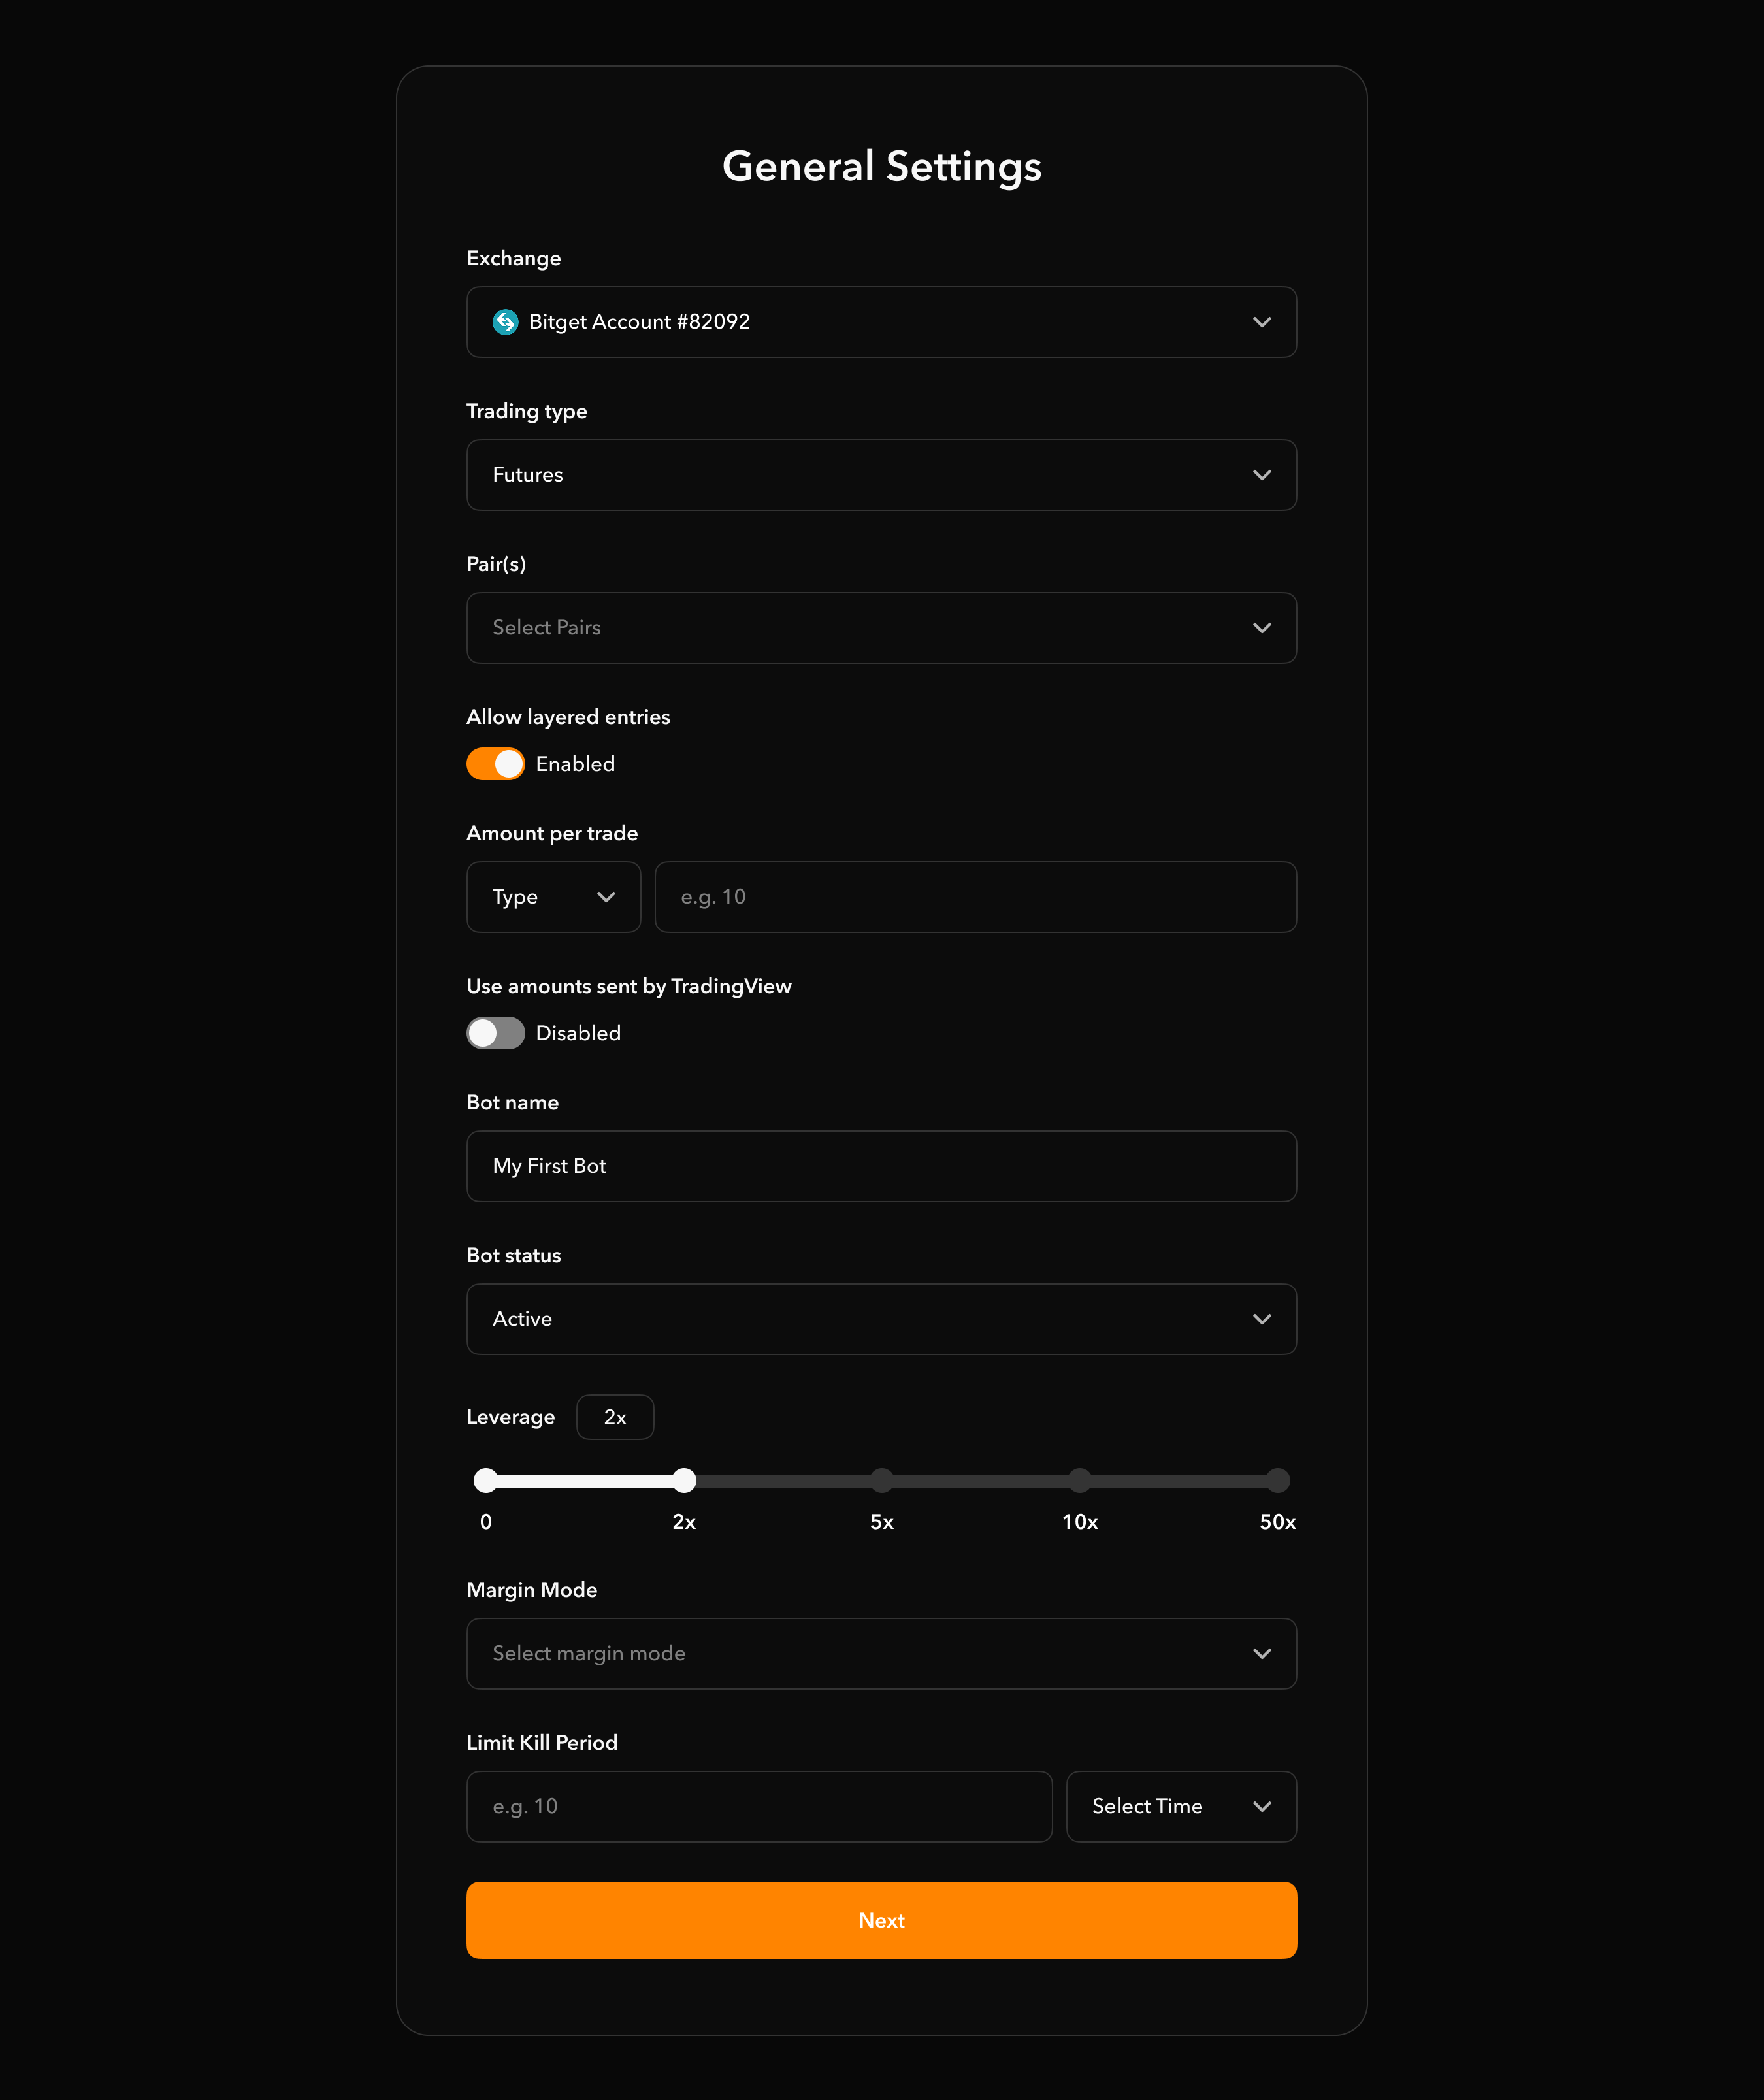
| General Settings |
General Settings Fields
| Field | Description |
|---|---|
| Exchange | Choose your connected exchange (e.g. Bitget, BloFin, TradeStation) |
| Trading Type | Choose Spot or Futures |
| Pair(s) | Select the crypto pair (e.g. BTC/USDT) your bot will trade |
| Allow Layered Entries | Enable to allow the bot to scale in with multiple entries |
| Amount per Trade | Choose either: Fixed Dollar Amount (e.g. $20) or % of Account Balance (e.g. 5%) |
| Use TradingView Amount | If enabled, the bot will respect the size passed in your TradingView alert |
| Bot Name | Name your bot (e.g. "Breakout Sniper") |
| Bot Status | Set the bot to Active or Inactive |
| Margin Mode | Select Cross or Isolated when futures is selected |
| Limit Kill Period | (Optional) Auto-cancel inactive limit orders after this duration (e.g. 10 mins) |
✅ Once filled, click the orange Next button to continue to the TradingView webhook instructions.
🔗 Step 3: Connect to TradingView
After saving your bot configuration, you’ll see the message:
"Bot created! Now connect your bot to TradingView"
This screen gives you a unique webhook URL and important instructions.
⚠️ Match Your Chart to Your Exchange
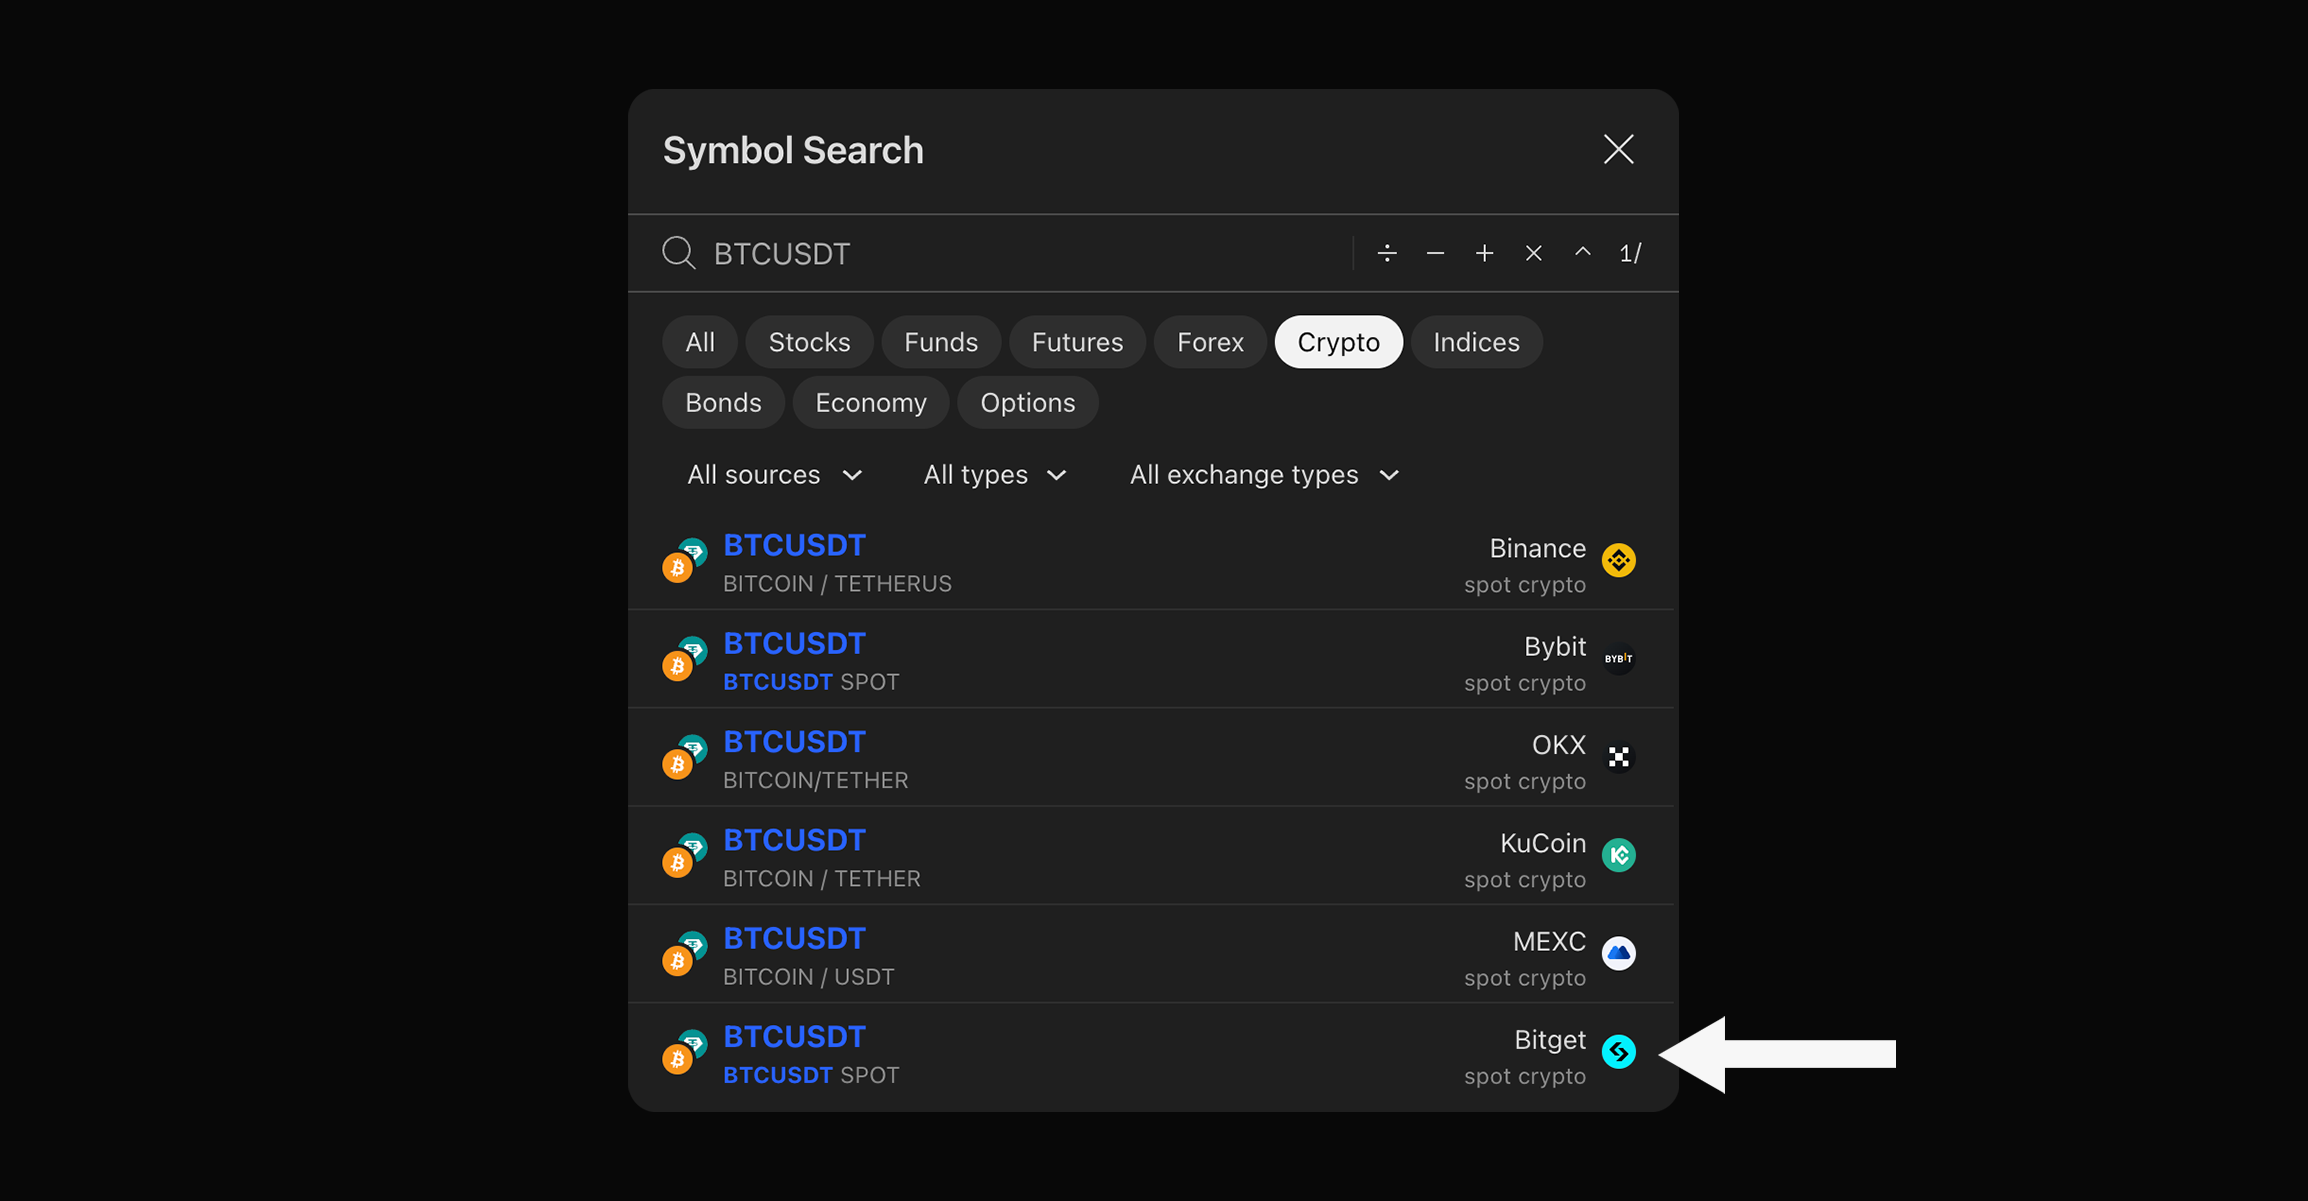
Ensure your TradingView chart matches the exchange you selected during bot setup.
For example:
- If you selected Bitget, trigger alerts from a Bitget chart.
- If you use a Binance chart for a Bitget bot, the alert will misfire or fail.
 |
|---|
| Ensure your TradingView chart matches the exchange you selected |
🌐 Step 4: Copy Webhook & Alert Messages
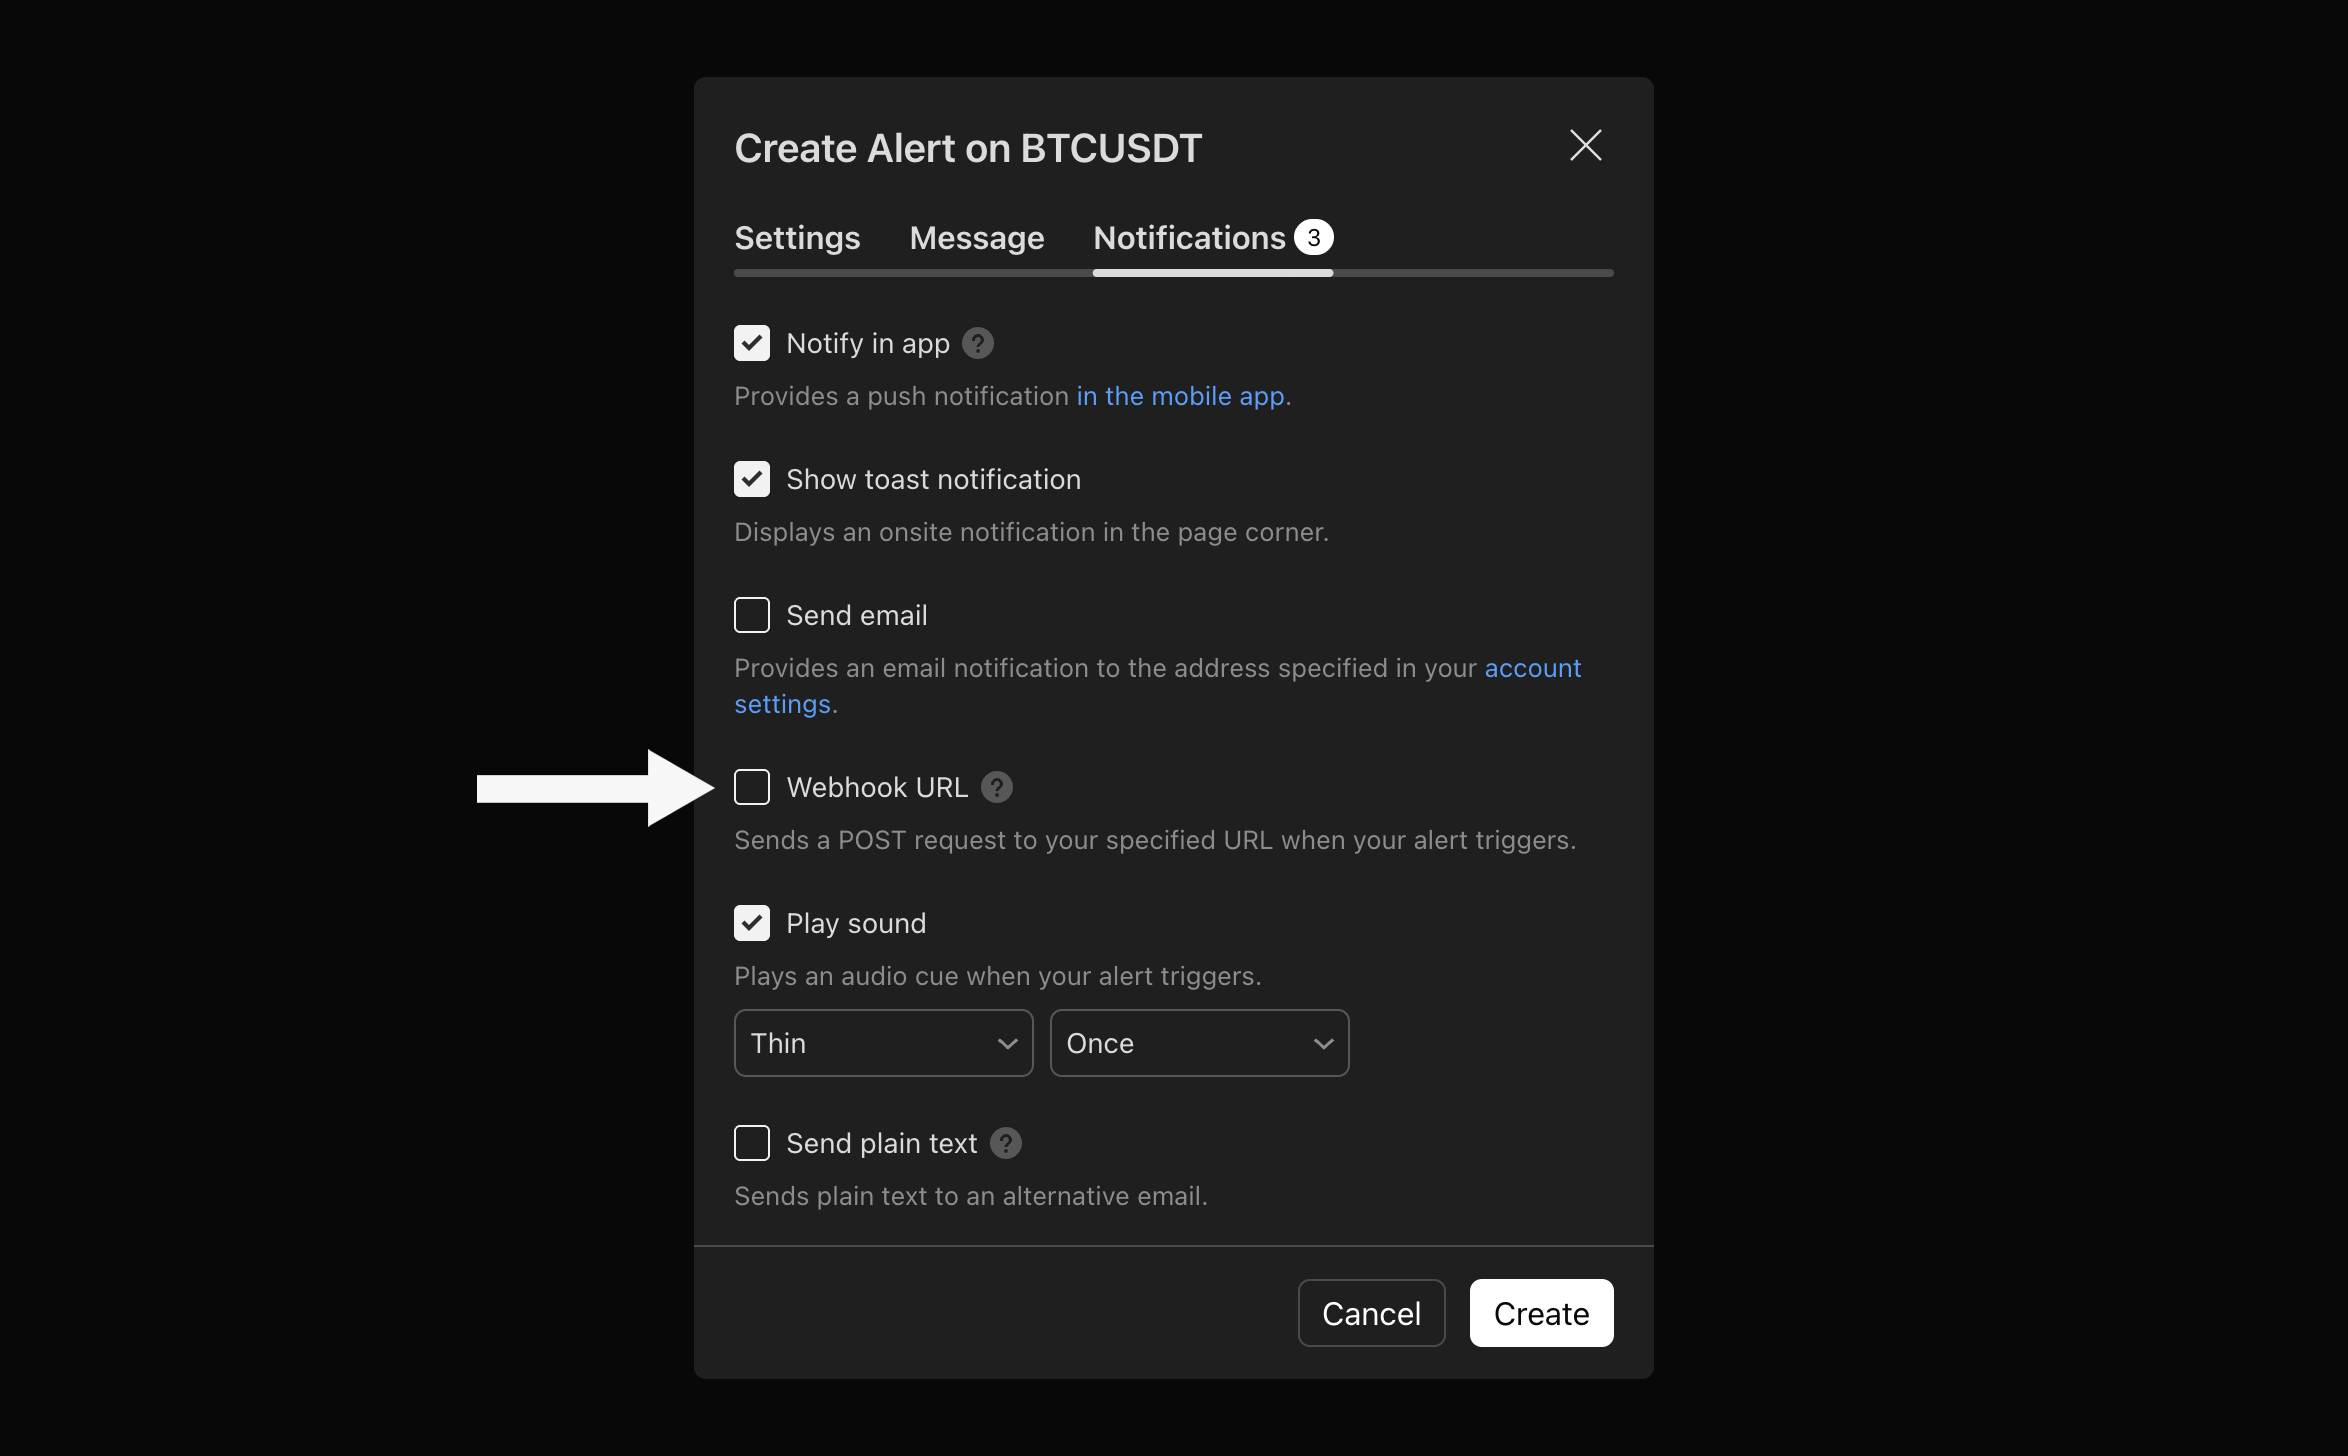
1. Webhook URL
This is your unique endpoint. Copy and paste it into the "Webhook URL" field when creating your TradingView alert.
https://api.primeautomation.ai/webhook/ChartPrime/xxxxxxxx-xxxx-xxxx-xxxx-xxxxxxxxxxxx
📋 Click the copy icon in the interface to quickly grab the link.
 |
|---|
| Activate Webhook URL on TradingView and paste your bot's Webhook URL |
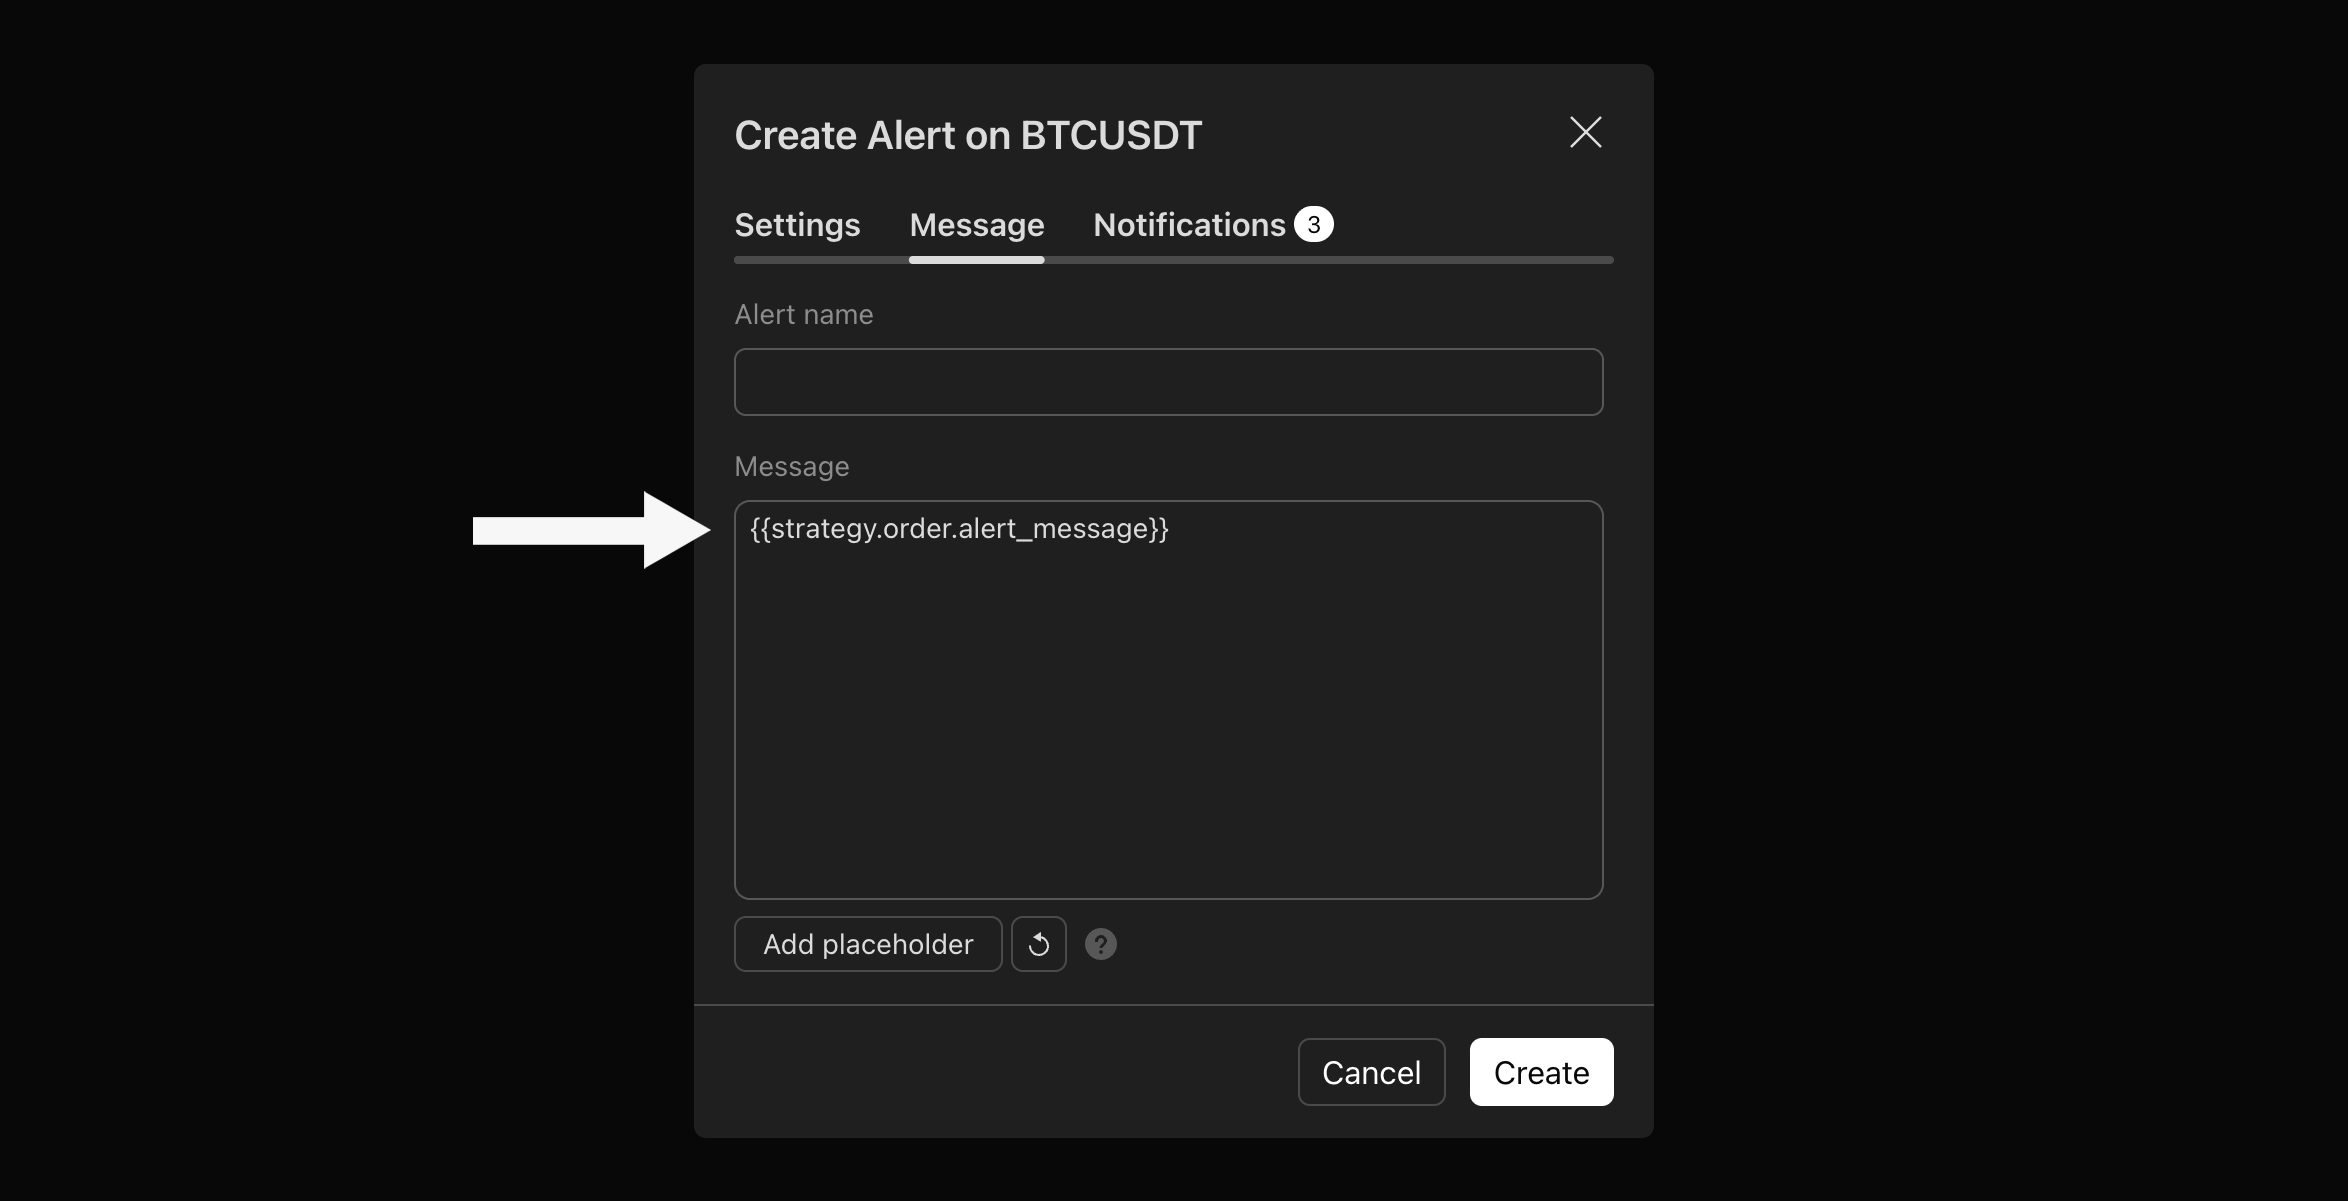
2. Basic Alert Message (for non-ChartPrime users)
If you're using any TradingView strategy other than PA Strategy Builder, use:
{{strategy.order.alert_message}}
Paste this into the "Message" field of your TradingView alert. It will send signal details (buy/sell/exit) automatically.
 |
|---|
| Paste message here |
3. Full Indicator Message Templates (Advanced)
Use these JSON message formats to send custom webhook signals with full control. Each of the items in the double braces is replaced with a value when the alert is sent off to PrimeAutomation.
✅ BUY
{
  "ticker": "{{ticker}}",
  "action": "buy",
  "price": "{{close}}",
  "time": "{{timenow}}",
  "size": "{{size}}"
}
🟡 EXIT_BUY
{
  "ticker": "{{ticker}}",
  "action": "exit_buy",
  "price": "{{close}}",
  "time": "{{timenow}}",
  "size": "{{size}}",
  "per": "{{per}}",
  "sl": "{{sl}}",
  "tp": "{{tp}}"
}
🔻 SELL
{
  "ticker": "{{ticker}}",
  "action": "sell",
  "price": "{{close}}",
  "time": "{{timenow}}",
  "size": "{{size}}"
}
🔴 EXIT_SELL
{
  "ticker": "{{ticker}}",
  "action": "exit_sell",
  "price": "{{close}}",
  "time": "{{timenow}}",
  "size": "{{size}}",
  "per": "{{per}}",
  "sl": "{{sl}}",
  "tp": "{{tp}}"
}
📌 These are for advanced Pine Script users or when building your own signal logic. You can dynamically insert variables using TradingView alert syntax.
✅ Final Step: Deploy & Monitor
Click Continue to Dashboard.
Your bot is now live and ready to receive webhook alerts. You’ll see it appear on your dashboard where you can:
- 🟢 Toggle it ON/OFF
- ✏️ Edit configuration
- 📊 Track live trades and PNL
- 🧾 View trade history
🧠 Best Practices
- 🔐 Keep your webhook URL private. It acts as the key to your bot.